Slack commands を Google Cloud Functions で実装する。
Slack commands は slack 上で /command arguments 形式で入力すると何かしらの応答を返す仕組み。/ から始まるのでSlack Slash command とも呼ばれるようだ。
詳細は公式 API ページを参照: Slash Commands | Slack
過去につくった Slack Bot が動かなくなったので、GCP を利用して作り直そうというのが背景。
クラウドへのデプロイについては serverless framework を利用した。
今回は、slack で /ping というコマンドを実行したら、pong と返すような slack command を作る。
できあがりは以下のような感じ。
事前設定
serverless framework のインストール方法は serverless framework による AWS Lambda ローカル開発 – momota.txt を参照。
今回は、AWS Lambda (Javascript) ではなく GCP Cloud Functions (Python) を使う。
事前に GCP のクレデンシャル設定が必要となる。
- GCP クレデンシャル設定の詳細は公式を参照してほしい: Serverless Framework – Google Cloud Functions Guide – Credentials
- 概要は以下。
- 請求先アカウントを作成
- 新規の Google Cloudプロジェクトを作成 (プロジェクトIDを控える)
- 必要な API を有効化。以下。
- Google Cloud Functions
- Google Cloud Deployment Manager
- Google Cloud Storage
- Stackdriver Logging
- クレデンシャルを入手する
- サービスアカウントを作成
- ロールの付与
- Deployment Manager Editor
- Storage Admin
- Logging Admin
- Cloud Functions Developer
- クレデンシャルキーファイルの作成 (keyfile.json)
- キーファイルのデプロイ:
~/.gcloud/keyfile.json など
serverless サービスの作成
ここでは ping という名前でサービス (プロジェクトのようなもの) を作成する。
1
2
3
4
5
6
7
8
9
10
11
12
| $ serverless create --template google-python --path ping
Serverless: Generating boilerplate...
Serverless: Generating boilerplate in "/path-you-want/ping"
_______ __
| _ .-----.----.--.--.-----.----| .-----.-----.-----.
| |___| -__| _| | | -__| _| | -__|__ --|__ --|
|____ |_____|__| \___/|_____|__| |__|_____|_____|_____|
| | | The Serverless Application Framework
| | serverless.com, v1.40.0
-------'
Serverless: Successfully generated boilerplate for template: "google-python"
|
作成したサービス名と同名のディレクトリが作成されるので、移動する。
以下のファイルが自動生成されている。
1
2
3
4
5
6
7
8
| $ ls -la
合計 24
drwxr-xr-x 2 momota momota 4096 4月 2 22:45 .
drwxr-xr-x 5 momota momota 4096 4月 2 22:45 ..
-rw-r--r-- 1 momota momota 597 4月 2 22:45 .gitignore
-rw-r--r-- 1 momota momota 362 4月 2 22:45 main.py
-rw-r--r-- 1 momota momota 303 4月 2 22:45 package.json
-rw-r--r-- 1 momota momota 1431 4月 2 22:45 serverless.yml
|
プロバイダプラグインのインストール
プロジェクトディレクトリで npm install する。
プロバイダプロパティの更新
serverless.yml を編集する。
project フィールドにGCP プロジェクト ID の指定するのと、credentials フィールドにcredentials ファイルの相対パスを指定する。
functions 以下の memorySize, timeout, labels はお好みで設定する。
handler フィールドで指定している ping が後述する Python コードの関数名になっており、Cloud Functions 起動時に当該関数が呼び出される。
1
2
3
4
5
6
7
8
9
10
11
12
13
14
15
16
17
18
19
20
21
22
23
24
25
26
27
28
29
30
31
| service: ping
provider:
name: google
stage: dev
runtime: python37
region: us-central1
project: YOUR-GCP-PROJECT-ID
credentials: ~/.gcloud/YOUR-KEYFILE.json
plugins:
- serverless-google-cloudfunctions
package:
exclude:
- node_modules/**
- .gitignore
- .git/**
functions:
ping-command:
handler: ping
events:
- http: path
memorySize: 256
timeout: 60s
labels: {
application: slack-slash-command,
environment: production,
owner: momota
}
|
Functions コードの実装
Slack から ping を受けたら pong を返す Python コードを書く。
Slack command が実行されとき Slack から送信されるリクエストは以下のようなフォーマットになっている。
1
2
3
4
5
6
7
8
9
10
11
12
13
| token=gIkuvaNzQIHg97ATvDxqgjtO
&team_id=T0001
&team_domain=example
&enterprise_id=E0001
&enterprise_name=Globular%20Construct%20Inc
&channel_id=C2147483705
&channel_name=test
&user_id=U2147483697
&user_name=Steve
&command=/weather
&text=94070
&response_url=https://hooks.slack.com/commands/1234/5678
&trigger_id=13345224609.738474920.8088930838d88f008e0
|
これに対して、以下のような Json フォーマットでレスポンスを返す必要がある。
1
2
3
4
5
6
7
8
9
| {
"response_type": "in_channel",
"text": "It's 80 degrees right now.",
"attachments": [
{
"text":"Partly cloudy today and tomorrow"
}
]
}
|
main.py を編集する。以下のようなコードになる。
1
2
3
4
5
6
7
8
9
10
11
12
13
14
15
16
17
18
19
20
21
22
23
24
| import json
from flask import jsonify
# ping を受けたら pong を返す関数
def ping_command(query):
return 'pong :table_tennis_paddle_and_ball:'
def format_slack_message(message):
return {
'response_type': 'in_channel',
'text': message,
'attachments': []
}
# Cloud Functions で起動される関数: メイン関数
def ping(request):
# validate request
if request.method != 'POST':
return 'Only POST requests are accepted', 405
message = ping_command(request.form['text'])
response = format_slack_message(message)
return jsonify(response)
|
Flask ライブラリに依存しているので、requirements.txt を作る。
1
| $ echo "Flask==1.0.2" >> requirements.txt
|
GCP へのデプロイ
serverless deploy により、GCS にソースコードがアップロードされ、Cloud Functions が Python 3.7 で起動する。
これはマネジメントコンソールからも確認できる。
1
2
3
4
5
6
7
8
9
10
11
12
13
14
15
16
17
18
19
| $ serverless deploy -v
Serverless: Packaging service...
Serverless: Excluding development dependencies...
Serverless: Compiling function "ping-command"...
Serverless: Uploading artifacts...
Serverless: Artifacts successfully uploaded...
Serverless: Updating deployment...
Serverless: Checking deployment update progress...
................................
Serverless: Done...
Service Information
service: ping
project: YOUR-GCP-PROJECT-ID
stage: dev
region: us-central1
Deployed functions
ping-command
https://us-central1-YOUR-GCP-PROJECT-ID.cloudfunctions.net/ping
|
slack の設定
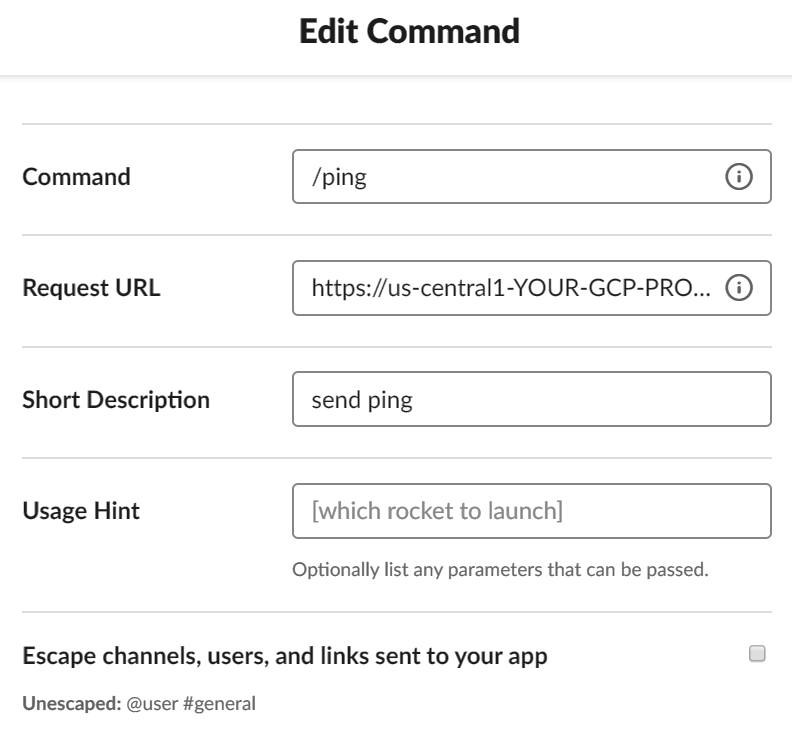
Slack API: Applications | Slack から Create New App ボタンをクリックしコマンドを作成する。
設定のやり方はこのあたりを参考にしたら良いと思う。: Slackのコマンドを作ろう!! – Qiita
command 作成時の Request URL に作成した Cloud Functions のエンドポイント https://us-central1-YOUR-GCP-PROJECT-ID.cloudfunctions.net/ping を指定する。
Slack の設定が終わると、Slack から使えるようになる。
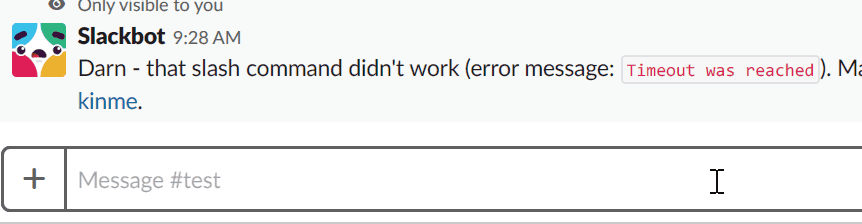
Functions は初回起動時に少し時間がかかる。
Slack command は 3000 ms (3秒) 以内に応答しないとタイムアウトになってしまう。
タイムアウト時は Slack command を再実行してみたら良い。